make decorative felt
True decorative or ‘flat ‘ felt (as opposed to felted knitting), in its simple fabric state, is made from either dyed or undyed wool tops. This is pure wool in washed and combed, but not spun, state. To get some inspiration have a look at World of Wool where you can buy undyed tops from all the most distinguished sheep breeds or dyed merino tops in a vast array of colours plus all the extras to help your creative work. For coloured work the 23 micron size is fine. Blacker Yarns also sell carded undyed original breed wool which can be used for felting.
Felt is not difficult to make at home. It does not require expensive equipment and it can be turned to all sorts of purposes and decorated, embellished, reshaped or retextured in many ways. It can then be made into jewellery, bags, clothes, slippers, decorative pieces and three dimensional, and household, objects. For the textiles artist it is an endless source of fascination.
EQUIPMENT
The equipment required is not expensive.
You will usually need:
- wool top in your chosen colours
- bubble wrap – a piece 1 metre for small pieces of felt
- a water spray bottle of plant spray type
- some liquid, unperfumed soap and, optionally a bar of same (olive oil soap is good)
- a felt roller, rolling pin or homemade roller (see below)
- a rolling mat ( see below) to speed up the process
- two clean towels for craft use, one to go on the table and a small one for rolling
- some protection for your table from water
- a certain amount of muscle power
- being close to a sink will help and prepare for some water spillage on table and floor

THE FULLING PROCESS
The rolling process required to turn wool tops into felt is known as fulling. To do this at home you will need to roll your piece when the fibres begin to knit. For best results this doesn’t mean only rolling on it flat as you would with a rolling pin but also rolling it up around something and then rolling it. The best option at home is to use pieces of polystyrene pipe lagging which are light polystyrene tubes which you can obtain from DIY shops. These are soft on your arm muscles. Alternatively, you can use a rolling mat available from World of Wool and use this in combination with your cookery rolling pin or a purpose bought roller.
DECORATION
You can add in threads of wool or silk, different colours of wool top, special textured types of wool such as neps and bamboo (more later), small pieces of fabric made from natural fibre or other bits of felt (more on these later). For a first attempt I suggest using only wool tops of different colours and threads of wool or silk in order to learn technique.

PREPARATION
- cover your table
- then lay a towel
- lay out bubble wrap
- fill plant spray with warm water and add some liquid soap
- fetch your wool tops and decorative bits and turn on the radio!
INSTRUCTIONS
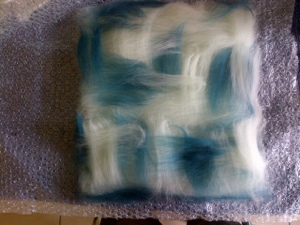
- fold your bubble wrap in half with with the bubbled side inside and then open it
- now you need to lay the wool top fibre out in a mat inside the bubble wrap by taking a section of top, dividing and then spreading the fibres and pulling them out in three inch sections:
- first layer
- second layer
- third layer
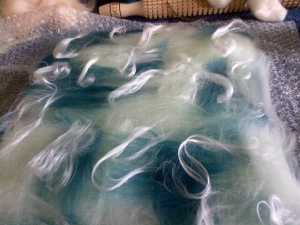
- add to the surface any decoration in shaped or twisted wool top pieces and threads of wool or silk
- now wet your fibre mat well with the soap and water spray
- close the bubble wrap over the wet felt and gently rub to start to knit the fibres
- after rubbing gently all over you can rub more briskly using a washing up pad or a small spare piece of bubble wrap
- every so often lift the wrap and check your work is still flat and in shape
- the work you put in at this rubbing stage is important for good results
- now to full your work place the small towel underneath the bubble wrap, close the bubble wrap and roll towel and the wrapped felt around your roller
- roll back and forward in one direction, on your surface, for, about twenty times
- check you work, reshape it if needed, turn it one quarter clockwise and repeat
- repeat four times to full your work in all directions and respray periodically
- after a while your work will begin to shrink and a slightly bubbled fabric will form and this is early pre-felt
- keep pulling into shape and rolling until you have a clearly formed fabric. If you need a break, even for some days, fold your work up wet in a towel and store flat. Usually though you can complete a piece in a two hour session from start to finish. If your felt gets cold dip it into a sink of warm water and resoak it with soap. If it gets slightly misshapen you can to stretch it into shape
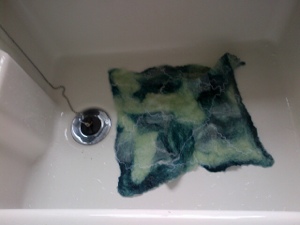
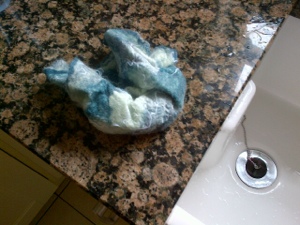
- when your work is felted it will have shrunk by about one third, rinse it in clean hand hot, then cold, then hot, then cold, water to help shrink the fibres, then squeeze it out and beat against a hard surface. All this cruel treatment helps the fabric to form
- reshape and hang to dry or dry flat
: lay a fine layered mat by laying a section with over-lapping fibre ends and the fibres going in vertical direction, then another section to its side, and so on, until you have a thin mat.
: lay a second layer with fibres going horizontally.
: lay a third layer with fibres in the original orientation.


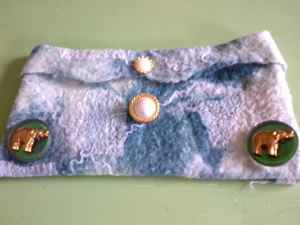
A small first piece can be used to decorate a small table or dressing table or can be folded easily into a purse shape. Add a pretty buttton closure and sew the edges. As a fan of buttons, I often start with a button in mind and centre my colour scheme around that choice.